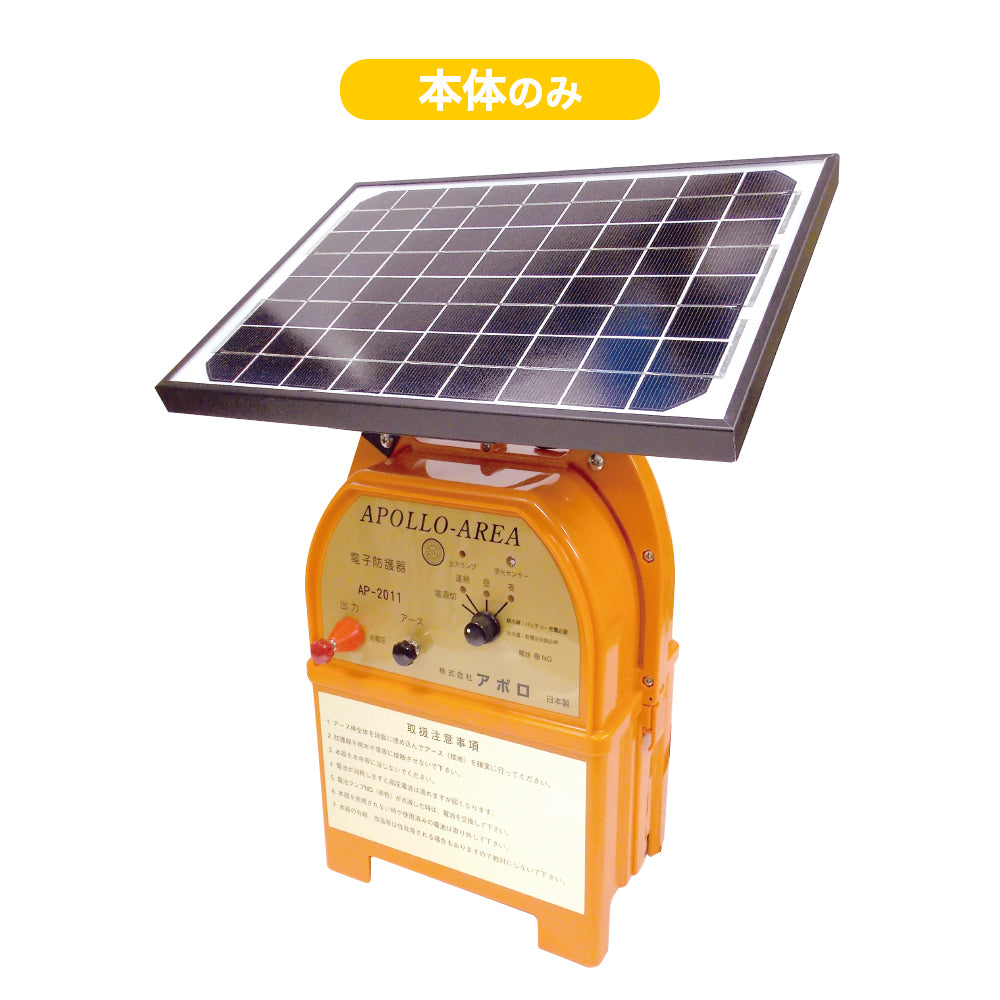
Apollo electric fence body AP-2011-SR with solar panel (body only)
Apollo electric fence body AP-2011-SR with solar panel (body only)
- 出荷日目安:
- Ships within 3-4 business days
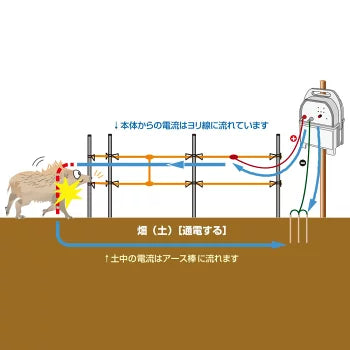

商品説明
Please check before ordering

○ It is the sale in the body simple substance. If you are looking to purchase poles and wires, please see this page where you will find all the materials you need to install an electric fence. ○The maximum cable length per unit is 3,000m. *Varies depending on installation conditions.
○With battery for 10W solar panel & solar charge. You can drive it without purchasing a power supply separately. This is the type that does not come with a solar panel .
○Considering the sunshine on the main unit, install the solar panel in a location that is not shaded, facing due south. If the installation direction or the panel surface is shaded, the charging may be insufficient.
○ It is necessary to install the main unit so that it does not touch the ground. Please prepare wooden stakes separately according to the ground of the installation place. * Mounting brackets for fixing to wooden stakes are included with this product.
○Although this device is rainproof, install it on a brick or a wooden pole to prevent it from being submerged in water.
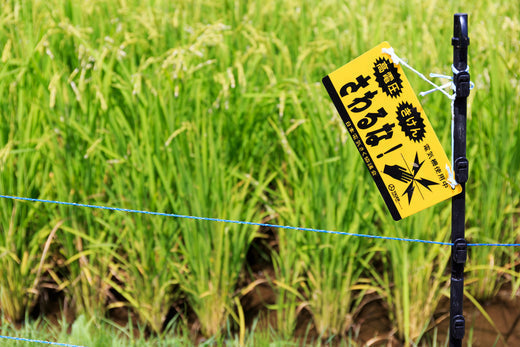
○ Please install a caution signboard using an electric fence (also included with this product) in a position where people can easily see it.
○Please be careful not to allow children to come near the installation location.
to install an electric fence
To install an electric fence, you need a main body (power supply) set and an electric wire set (electric fence rope, insulator, post, gate clip). *Please note that struts, insulators, and gate clips are not compatible with other manufacturers.

Main unit (power supply) set
A power supply unit for sending electric shocks, a hazard sign, a grounding rod, a high-voltage wire, a main unit mounting bracket, and a voltage detector (tester) are included as a set. (Accessories vary depending on the manufacturer.)

electric wire set
Please combine the rope (electric wire) for transmitting electric shock, the strut for stretching the rope, the insulator, and the gate clip to be installed at the entrance according to the length of the electric fence you are using. Also sold as a set.
Ultimate anti-animal measures with an electric fence from a specialized manufacturer

Can be installed in places where there is no power supply
Since it is solar powered, it can be used in places where there is no power supply. The free solar energy is effectively used, and the energy generated by the solar panel is stored in a special battery. The stored energy is used to power the system, so it works even in bad weather and at night.

Outstanding ease of use
The operation is simple, so you can easily switch the operation. When the battery level becomes low, the power lamp flashes to notify you of the time to replace the electricity.

It is also possible to set the operating time
It is also possible to detect the brightness of the surroundings and automatically operate "drinking during the day" and "only at night". Can be set with a changeover switch ("Continuous": Operates continuously day and night. "Day": Operates only during the bright day. "Night": Operates only at night when it gets dark.)
Example of installation method for each animal
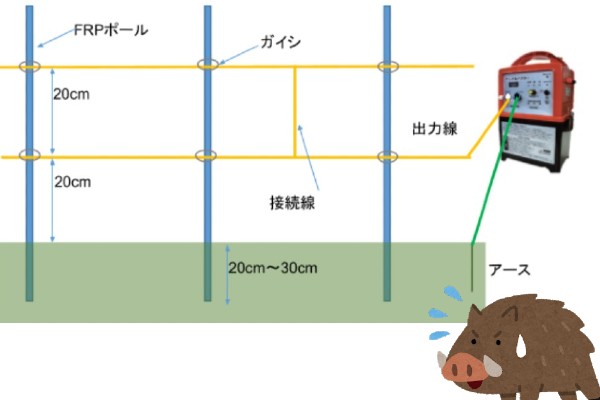
Wild boar countermeasures (two-tiered)
Wild boars have very sensitive noses, so the fence should be placed at the height of the nose. *Even if you try to hit the body, the effect will be diluted.
Drive the post (FRP pole in the figure) 20 to 30 cm into the ground. The approximate distance between poles is 200-400cm (adjust according to the terrain). Install two insulators per pole at intervals of 20 cm. Connect the connecting lines at intervals of 50 meters.

Measures against deer (4 layers)
Install the fence line at a height where you cannot pass through the lower row and at a height where you cannot jump over the upper row.
Drive the post (FRP pole in the figure) 20 to 30 cm into the ground.
The standard distance between poles is 300-400cm (adjust according to the terrain). Install 4 insulators per pole at intervals of 30 cm. Connect the connecting lines at intervals of 50 meters.

Measures against monkeys (8 columns)
Install it in a position where it cannot jump into, such as a tall tree or a telephone pole. Drive the post (FRP pole in the figure) 20 to 30 cm into the ground.
The standard distance between poles is 300-400cm (adjust according to the terrain). Install 8 insulators per pole at 20cm intervals. Use two connection wires as a pair and connect them at intervals of 50 cm (+ and - are connected at different levels).
Product line-up
 This set is recommended as a countermeasure against wild boars. A complete set of equipment needed to install an electric fence. Learn more
Product specifications
| 入力電源(DC) | ソーラーパネル+充電式バッテリー(付属品) |
|---|---|
| 出力電圧(DC) | 約10,000V |
| 本体出力ランプ | 高圧が出力されている時に点灯します。 |
| 本体外形寸法 | 巾205mm×奥行155mm×高さ310mm |
| 本体重量 | 約6.0kg |
| 付属品 | 本体、ソーラーパネル、専用バッテリー、アース棒3連、本体取付金具、高圧線、危険表示板、保証書付取扱説明書 |

 箱罠
箱罠
 くくり罠
くくり罠
 パーツ類
パーツ類
 電気柵
電気柵
 自作キット
自作キット
 防獣グッズ
防獣グッズ
 監視カメラ
監視カメラ





 box trap
 tying trap
 enclosure trap
 Prevention and avoidance goods
 electric fence
 trap surveillance camera
 transportation goods
 Trap detection sensor
 hunting supplies
 hunting books
 Anti-bird goods
 Agricultural materials/machinery
 boar
boar
 deer
deer
 Kyon
Kyon
 monkey
 raccoon
 Badger
 palm civet
 raccoon dog
 nutria
 mouse or rat
 Mole
Mole
 bear
bear
 pigeon
 Crow
Crow

